Description
The October Caddis hatch and GBF’s Upper Sac
outing - a marriage made in heaven - are
imminent. So, members attending the outing
need to be armed and dangerous with good,
workhorse fly patterns. Over time, I have
developed a series of five deadly flies for
the various life stages of that marvelous
insect, the Giant October Caddis, aka
Dicosmoecus. You can find these patterns
on my web site at:
http://www.billcarnazzo.com/flytying/patterns/index.htm
One of these patterns is Bill’s Big Fish Fly
(see also GBF’s web site, “Fly Pattern
Archives,” January, 2009). This fly is
beyond effective for October Caddis adults
when the fish are keying on them; in fact,
it should be forever banned for engaging in
serious misconduct. Still, for many tyers,
the Big Fish Fly is a bit complicated to
tie. So, let’s look at some alternatives.
There are, of course, other patterns that
work as October Caddis adults - the hallowed
Stimulator is just one good example. But
I’ve never found one that rivals the Big
Fish Fly - until, that is, I designed the
October Bandit. Don’t get me wrong - I’ll
never abandon the BFF. I just want to offer
an alternative that will bring fish to the
surface with vengeance in their hearts, yet
is simple and quick to tie.
So I began with the ultra-simple Shambles
Caddis, featured in the July, 2009 Leader
(see “Fly Pattern Archives” on GBF’s web
site). Since then, Shambles has undergone
some minor modifications and I’ve settled on
a favorite color and size: lime green, #16.
For the seven main streams of the Middle
Fork American drainage, I don’t use any
other dry fly; the same goes for the North
Yuba. In other words, it has undergone a
lot of field testing. So, why not use it as
the basis for an October Caddis adult? Duh!
And so the October Bandit came into being. I
tie them with two different body materials:
October Caddis orange dubbing and orange
closed-cell foam. For this month’s fly, we
will use dubbing.
Tying Instructions
|
1.
Smash the hook barb and place the hook in your vise. Cover the hook
with thread back to the hook
bend.
2.
Cut, clean, and stack a small bunch of medium dun deer hair. Choose
hair that is of medium texture;
in other words, don’t use hair
that is suitable for spinning as
it is too hollow, or hair that
is too fine and won’t flare at
all. We want hair that will
flare some, but not too much.
3.
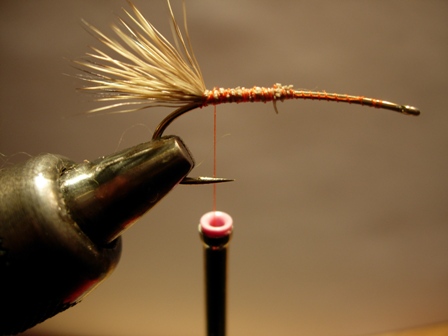
Measure the tail hair to about 1/3 of the length of the shank. Tie
it in securely at the hook bend
(see photo for detail). Place a
drop of super glue on the
tied-down butts.
4.
At the same tie-in point, tie in a piece of gold wire for ribbing
and a properly sized saddle
hackle. The hackle barbules
should approximate the size of
the hook gape.
|
 |
|
|
|
5.
Form a dubbing loop and dub the abdomen with a taper, larger to the
front. End the dubbing at the point
where the thorax will begin and the wing
will be tied in, which is about one
third shank length behind the hook eye.
Do not use excessive amounts of
dubbing—even synthetic dubbing will hold
water—and be sure to leave the front
third of the hook open as we will need
the room for a proper wing.
6.
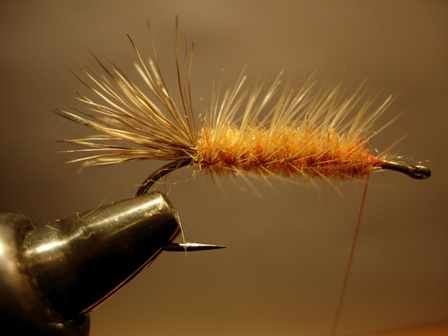
Rib the abdomen with the gold wire, and tie it off at the front end
of the abdomen. Wrap the hackle forward,
using 5 or 6 turns, and tie it down at
the same spot.
7.
Turn the fly upside down and carefully trim out the hackle on the
bottom. It serves no purpose whatsoever;
since natural bugs ride in the surface
film and not above it, the underside
hackle would preclude the natural
appearance and generates a lot of
refusals (boils that appear to be takes
but in reality are caused by fish
turning away at the last moment).
|
 |
|
|
|
8.
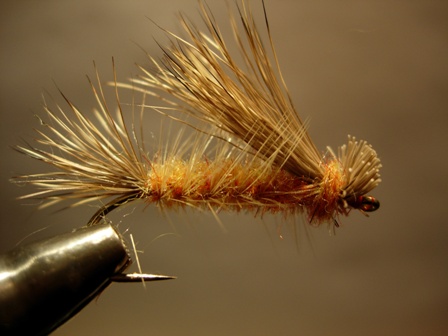
Be sure that the front third of the hook is open and covered with
thread to provide a good base for the
wing. Cut, clean, and stack a robust
bunch of hair; measure it so that the
wing will reach to the middle of the
tail. Tie the wing in securely in the
middle of the front third of the hook,
being sure to keep all of the hair on
top.
9.
Trim the butts of the hair so that you leave a small head, similar
to an Elk Hair Caddis. Add a drop of
super glue to the wing tie-in point.
10.
Add a small amount of dubbing at the base of the wing to represent
the thorax, and bring the thread to the
eye of the hook. Form a small, neat head
there and whip finish.
|
 |
|
|
|
|
Tying Tips
1.
You can substitute closed cell foam for the dubbing for the
abdomen. If you choose to do this, cut a two inch strip of foam that is
about 1/8 “ at one end and 3/16” at the other end. Tie the narrow end in at
the same place that the tail is tied in, and wrap it forward to the same 1/3
point on the shank.
2.
One of the things I have learned about the October Caddis hatch is
that during late September and most of October, the fish key on the larvae
and emerging stages. Yes, you will catch some trout on the adult fly during
this period, but you will catch far more if you stick with subsurface
patterns. In late October and on into November and December, as the weather
becomes cold, rainy, and snowy, you can fish adults most of the day with
success.
Tie up a
few of these for the October Caddis hatch, and…
|
|
|
|
|
 |
|