|
|
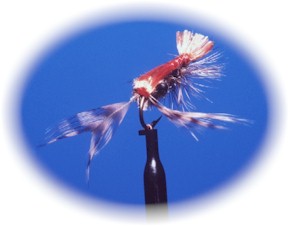
Neale's Crayfish
Here is a pattern that was featured in this column a few years ago.
Because it's bass time, and because I've had several requests for this pattern, it is worthwhile to repeat it.
Incidentally, this pattern was highly successful at Sugar Creek Ranch this past winter for very large trout. So
don't just limit yourself to bass with this one--try it wherever there are trout and crawdads in the same body
of water.
E. Neale Streeks (who designed this beauty) is a creative tier; but,
after my own heart, he pursues simplicity of design and material. This crayfish pattern is a clear example of his
style--although I have taken the liberty of modifying the pattern significantly, to make it even simpler.
|
|
INSTRUCTIONS
1. Cover hook with thread. Tie on swiss straw just above the rear of
the barb, and leave it hanging out over the back of the hook.
2. Make mono-eyes by taking a 3/4" piece and holding it against the side of a candle flame using tweezers
or hackle pliers. Go slowly, and take care not to let melted mono drip on clothing or skin--avoid fire/burn danger
here by being very careful. Hold one end against the flame until a small ball is formed; let that cool, and then
do the other end. When finished, the whole thing should be about 1/4" long.
3. Tie the eyes in now, just abot the point of the hook; apply head cement to this point.
4. Now make the claws by taking two even saddles and stripping away the fuzz at the butt end. Leave the butts,
which should be about 1" long. Leaving about 3/4" of the hackle on the stem, trim out the centers of
the feathers.
5. Tie in the two claws so that the stick out at about a 45º angle, facing rearward. They should be tied in
at the same spot as you tied in the eyes.
6. Now reverse the butts and lash them down so they point out over the back of the hook, just in between the claws.
This forms the antennae.
7. In between where you tied in the swiss straw and where you tied in the eyes, there should still be a bit of
room.
8. Now take the weight and beginning just ahead of the eyes tie-in point, wrap it forward toward the hook
eye: to a point 1/2 way down the hook.
9. Tie in the hackle for legs on top of the lead wraps, just behind the eye.
10. Wrap chenille first in front of the eyes, then around and over the eyes and forward to apoint about
1/2 way down the hook. Stop wrapping at this point and wrap one wind of thread over the chenille to hold it in
place.
11. Tie in the wire ribbing at this point and let it hang. Move thread to the eye.
12. Finish wrapping the chenille forward to about 1/8" behind the hook eye and tie it off. Now grab
the hackle and palmer it forward for the legs.
13. Take the swiss straw and pull it over the body to the eye, spreading it out so it covers the back of
the fly, forming the shell. It should be directly between the antennae and claws. Tie down just behind the eye,
leaving about 3/8" of material sticking out over the eye to imitate the tail.
14. Wind the ribbing forward (4 or 5 wraps) and tie off behind the eye.
Fish the fly slowly, remembering that these critters swim backwards.
|