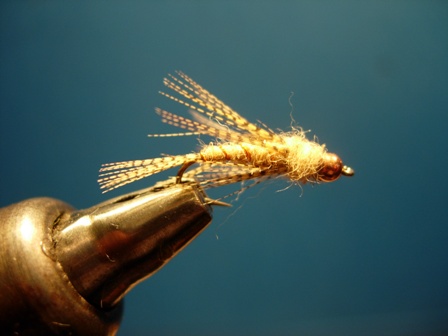
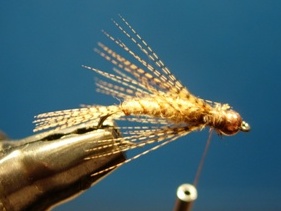
Description
This month’s pattern—Cal Bird’s “Bird’s Nest Nymph” — is an
old favorite that should lurk in every fly
angler’s nymph box. There have been
variations on the original pattern, but in
my opinion none of them achieve any degree
of “improvement” over Cal Bird’s original
design. I have added a bead to the hook—but
only to show that it can be tied either with
or without a bead.
GBF was fortunate to have had Cal Bird conduct a day of fly
tying at the club house many years ago. As I
recall, we have that session on video
tape—and should probably consider having it
re-mastered and transferred to a DVD format
for our library.
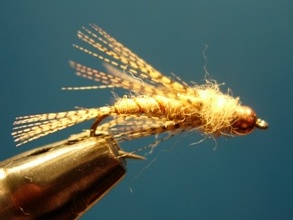
The hackle on this fly is located at the juncture of the
abdomen and the thorax, contrary to other
nymph designs where the hackle is placed
behind the eye and in front of the thorax.
The procedure for applying the hackle is
called the “distribution wrap,” which is Cal
Bird’s own description of the procedure. It
is a bit tricky to do properly, but does
result in an even distribution of the hackle
around the shank. Fortunately for us, Harry
Mason, a friend who is a highly regarded fly
tyer, has produced an excellent video on how
to tie the Bird’s Nest Nymph, including the
elusive distribution wrap. It can be found
at
http://www.troutflies.com/tutorials/nest/index.shtml
Finally, this is one of those flies that are
“tied in the round,” meaning that the fly
looks the same no matter how it is rotated.
Compare this to a standard nymph that has a
wing case on the top of the fly. In his
famous book titled
"Nymphing For
Larger Trout", Charlie Brooks stated that he
tied his flies "in the round" because a
swimming nymph always rights itself before
swimming away, and in order to mimic this
habit a fly should appear the same from any
angle. Thus, for his patterns that include a
wing case, the wing case surrounds the fly.
This simple idea revolutionized, so some
extent, the world of fly tying. For example,
think about how standard soft hackle
patterns are tied: The hackle is wrapped
around the hook and the body is uniform in
appearance—a perfect example of tying in the
round. The Bird’s Nest Nymph is a type of
soft hackle fly, in my view. I am partial to
soft hackle patterns because of the motion
of the fly in the water, attributable to the
hackle’s movement in the current. Sneaky,
eh?
Tying Instructions
|
|
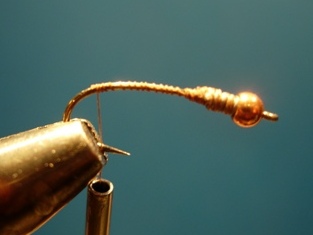
1. Smash the barb, place a bead on
the hook, and secure it by placing a
few wraps of lead of proper size
behind the bead. Jam the lead into
the large bevel of the bead, which
should be facing rearward. I tend to
use small beads—probably smaller
than manufacturers’ recommendation.
2. Secure the lead with thread wraps and
advance the thread to the rear of the hook.
|
 |
|
|
|
|
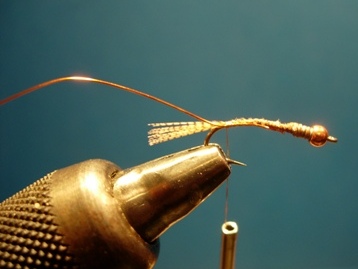
3. At a point just above the back
end of the barb, tie on a tail
consisting of a small bunch of wood
duck or teal flank feather fibers.
It should be about 2/3 of length of
the hook shank. Take a well-marked
flank feather and cut out the
“heart,” located at the top of the
feather (see Harry Mason’s video
clip showing this technique). Roll
the fibers and tie them in as
indicated above.
4. Tie in the copper wire which will
serve as the ribbing, at the same point
(see hint #1 below). |
 |
|
|
|
|
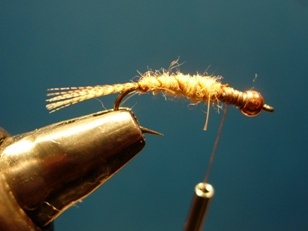
5. Dub a slender abdomen, taking
the dubbing 2/3 of the way up the
hook shank. Counter-wrap the copper
wire ribbing with a few close wraps,
and tie this off in front of the
dubbing. |
 |
|
|
|
|
6. Using the remaining
(bottom) portion of your flank
feather, with the tips facing
rearward, measure the barbules to
shank length. Take a loose wrap
around the entire piece right at the
front of the dubbed abdomen, drawing
the thread tight with a second wrap.
The effect will be to distribute the
barbules evenly around the abdomen
if done properly (hence the name
“distribution wrap”). Again, see
Harry Mason’s video for a good
visual presentation of this
technique:
http://www.troutflies.com/tutorials/nest/index.shtml
|
 |
|
|
|
|
7.
Dub a robust thorax in front
of the hackle, up to the back of
the bead; the thorax should be a
bit fuller than the abdomen.
Whip finish behind the bead.
|
 |
|
|
|
|
Tying Tips
1.
When tying in ribbing, it is a
good idea to flatten the wire
where it will be tied in. This
prevents distortion of the body.
2.
Try tying without using a bead,
so that you can experiment on
the stream with both versions.
3.
Tie some in olive also. I also
like to have some in black.
4.
Tie in different sizes, down to
#18. I even have some as large
as #6 in my nymph box.
Go crank some of these bugs, go fish them, and…
|
|
|
|
|
 |
|