Description
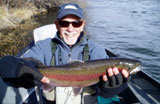
I first met Jim Pettis at the CalExpo ISE
show many years ago, where he was a featured
tyer in the Fly Tying Theater (then run by
Danny Byford). As I tend to be, Jim was
quiet and soft-spoken; we became good
friends over time. Jim guides on the Lower
Sacramento River at Redding and, as I can
personally attest, knows the river as well
as anyone can. He has launch rights at a
rather unique, privately owned spot some
distance above the Posse Grounds where most
everyone else puts in when fishing the upper
runs. Iĺve never seen anyone more skilled at
mending line to a floating indicator placed
far away from the boat (in some cases more
than 60ĺ out)Świthout moving the indicator.
At the invitation the Golden Gate Casting
Club in San Francisco, heĺs taught his
methods to the clubĺs members. One of Jimĺs
talentsŚand the one that first drew my
attentionŚwas his ability to innovate fly
designs that survive the test of time
despite an ever-skeptical cadre of fly
fishers, guides, and others. Principal among
his successes is the Caddis series, one of
which is the Pulsating Caddis, which Jim
first tied in 1993. The fly is featured in
Joe Warrenĺs book ôTying Glass Bead Flies.ö
The Pulsating Caddis can, in various sizes
and color combinations, represent many
different Caddis flies. It is an excellent
imitation for Hydropsyche, which
abound on the Lower Sacramento River. Here
are a few statistics on this bug:
Genus: Hydropsyche
Common names: spotted caddis; net-builder;
net-spinning caddis; gray caddis
Size: 10-15mm
Color: tan, brown, yellow-tan with greenish
or tan shroud
Here is an excellent summary of the habits
and characteristics of Hydropsyche,
taken from:
http://www.west-fly-fishing.com/entomology/caddis/spotted.shtml#
(an excellent website for fly fishing
information)
ôThis case-less caddis acts like a spider:
larvae build little nets in the crevices of
rocks and capture drifting plankton for
their meals. Their preferred habitat is
riffles and runs. They often drift in the
current; so, where there are large
populations, trout will feed on them
year-round.
A larva pattern dead-drifted near the bottom
can be very effective in spring and fall,
and even in winter. Many species are pale
green and look a lot like the green rock
worm or
green caddis; they are often
found in the same kind of water and can be
imitated with the same patterns and tactics.
In other waters, spotted caddis larvae are
more tan or brown. Pupation occurs in the
same water that the larvae lived in.
During a hatch, dead-drift a pupa pattern
near the bottom in riffle water or just
below riffles. An unweighted pupa pattern
can also be drifted near the surface, or you
can present a soft hackle fly with a wet-fly
swing. Another good strategy is a dry fly
with a pupa pattern as a dropper or trailer;
the dry fly acts as an indicator and
sometimes is taken by the trout. After the
hatch, errant and unlucky adults fall onto
the water, and a dry fly is the right
choice. Bank-water downwind or downstream
from overhanging trees is a good place to
cast your dry. Females swim or crawl
underwater to lay eggs. You can fish a dry
at this time, or go subsurface with a Soft
Hackle or diving caddis pattern.ö
Letĺs get busy and tie one of Jimĺs gems.
Tying Instructions
|
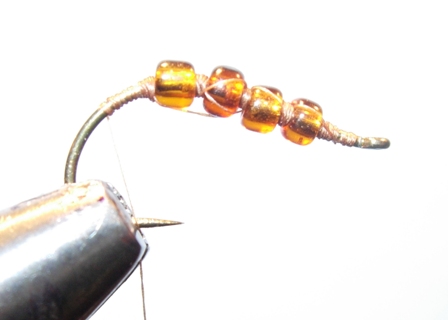
1.
Smash the hook barb and place
some beads on the shank; the
number will vary with the hook
style and size. For example, if
you are using a size 16 Tiemco
2457 hook, I suggest using three
beads. Tip: start with a size 12
use 4 or 5 beads to get the feel
of the proper number and then
work down in sizes,
experimenting as you go.
|

|
|
|
|
2.
Once youĺve got the hook in the
vise, start the thread near the
hook eye and wrap the front 1/8
of the hook with thread (this
will later become the area for
the thorax) in front of the
beads. Wrap rearward to the hook
bend, securing the beads each in
succession with several wraps.
Leave the thread at the middle
of the bend.
|
 |
|
|
|
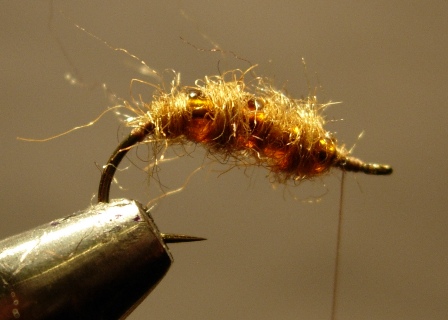
3.
Place some of the lighter brown
dubbing on the thread (here
again you should experiment with
the amount that you use,
starting with smaller amounts,
graduating to somewhat heavier
amounts).
4.
Place one wrap of dubbing behind
the last bead, and move forward;
place two wraps between each of
the beads until you reach the
thorax area. Place a half hitch
there in preparation for the
next step.
|
 |
|
|
|
5.
Using a piece of Velcro or a gun
barrel brush (which is what I
use), rub the dubbing with a
circular motion; this has the
effect of picking out the
dubbing and standing it up.
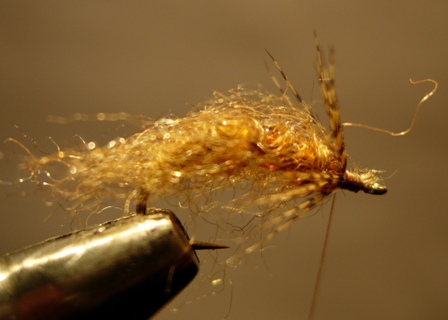
6.
Using your fingers, brush the
dubbing rearward so that it
resembles a sheath or shroud
(remember Gary LaFontaineĺs
patterns?).
|
 |
|
|
|
7.
Cut the very tip of the heart
from a well-marked wood duck
flank feather (set this aside
for some other use). Clip out a
1/8ö section of the stem; you
now have a ôvö shaped piece that
you should place, shiny side up,
on top of the hook directly in
front of the leading bead. Tie
it down there to form legs on
each side of the hook.
|
 |
|
|
|
8.
Dub the thorax with the dark
brown dubbing. Whip finish.
|
 |
|
|
|
|
Tying
& Fishing Tips
1.
As mentioned above, experiment
with your materials on this
pattern, and on all of your
patterns. This will enhance your
creativity by forcing you to
think about each step of the
pattern instructions.
Eventually, if you incorporate
this into your repertoire, you
will develop your own design
skills.
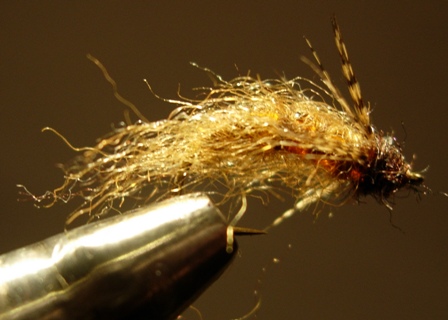
2.
Notice the picture above: the
thorax area is the same diameter
as the body, so your tying
techniques should take this
characteristic into account.
3.
Once you have done the legs,
wrap the thorax dubbing over the
leg tie-in area and slightly
over the legs; this will force
the legs into their proper
swept-back position.
4.
Because these critters engage in
behavioral drift (which accounts
for their success on the Lower
Sac), you should plan
accordingly with your
rigŚwhether you prefer floating
indicators, short-lining, or a
swinging approach.
Crank a few of Jimĺs jewels... |
|
|
|
|
 |
|