Description
This month we’ll learn a tying technique
called “pullover hackle” rather than tying a
specific pattern. I’m not sure who
originated the pullover-hackle technique for
dry flies. I first learned it from the
venerable Ned Long, who passed away a few
years ago after a long and productive life.
A long time fly tyer well-known in the tying
community, Ned created many original (and
very effective) fly patterns. The Northern
California Council of the Federation of Fly
Fishers named its coveted annual award to
the “fly tyer of the year” after Ned (I was
fortunate enough to have been selected for
this prestigious award in 2009). Bob
Quigley, another very creative fly designer,
also uses this technique in some of his
spring creek patterns.
There are several standard techniques for
applying hackle to dry flies: the standard
Catskill technique, whereby the hackle is
wound on perpendicular to the hook shank;
and the parachute technique, whereby a post
is created for the wing, and the hackle is
would around the post. The pullover-hackle
technique is a third way to hackle a dry
fly.
The pullover-hackle technique requires that
a piece of material (typically 4x tippet
material) be tied to the shank at some point
in the tying steps, to be used as a post. I
utilize this technique for “Bill’s Big Fish
Fly” which can be found in the fly pattern
archives on GBF’s web site. For dry flies,
the post is typically (though not always)
tied in at the front end of the abdomen. The
hackle is wound around the post from the
bottom up and then back down to the shank,
where it is tied off, pulled back out of the
way, and remains until the final tying
step. Once the thorax is dubbed (immediately
in front of the hackle post) the post and
hackle are pulled over the top of the thorax
and tied off just behind the hook eye. Hence
the name: “pullover-hackle.” As an
alternative to inserting the post at the
front of the abdomen, you can tie it in just
ahead of the tail and then pull it over the
entire fly—abdomen and thorax.
The beauty of this technique is that you can
get a lot more hackle on the post and, when
it is pulled over the top of the thorax, all
of it stays on top of the fly. This creates
a very buggy fly profile and a high-floating
attitude. Pullover-hackle flies are one of
my go-to pattern types for late afternoon
and evening fishing on creeks and smaller
rivers such as the North Yuba (small caddis
patterns work well also—see July 2009 fly of
the month, the Shambles Caddis).
Fly color/hue is limited only by your
imagination. For example, you can try using
two hackles (one brown and one grizzly) for
an Adams pullover; or a cream colored hackle
for a Light Cahill pullover. For purposes of
this month’s fly, we’ll create a generic dry
fly with a tan body and a grizzly hackle.
You generally won’t find this combination in
the fly bins at the shops—but don’t
underestimate it. Also, we’ll tie in our
pullover post at the rear of the fly, to be
different (besides, it makes learning the
technique a bit easier). You will need a
gallows tool or some other method to secure
the tippet material in an upright position
so you can wind the hackle around it. If you
don’t have a gallows tool for your vise, try
attaching a pair of hackle pliers to your
light.
Tying Instructions
|
1.
Crimp the hook barb and
cover the rear half of the hook
shank with thread; leave the
bobbin hanging so that the
thread intersects with the back
of the barb.
2.
Cut a small section of
well-marked wood duck flan
feather barbules. Measure the
tail fibers so that they equal
the length of the shank. Tie the
bunch right above the back of
the barb, take a few winds
forward to secure the tail, and
leave the thread there. Clip the
excess feather.
3.
At the same point, tie in
a 8” section tippet material and
wind back to where you tied in
the tail to secure the tippet
material. Place a tiny drop of
superglue on the winds.
|
 |
|
|
|
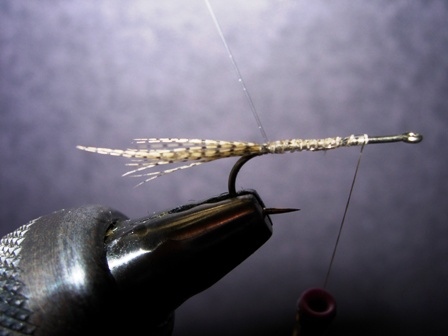
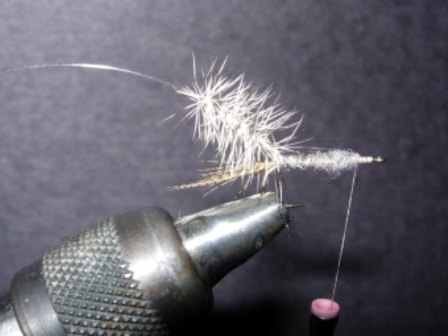
4a. Secure
the tippet material post in your
gallows tool (or the hackle
pliers you’ve attached to your
light). Tie in a properly sized
grizzly neck hackle at the base
of the post. Wind the hackle
clockwise around the post 3
times, moving upward in wide
turns. Begin winding back down
toward the shank, using very
closely spaced turns so that you
get most if not all of the
feather’s hackle on the post.
After the last wind, hang your
hackle pliers over the shank,
cut the tippet material about 2”
above the top of the hackle, and
tie the hackle down.
|
 |
|
|
|
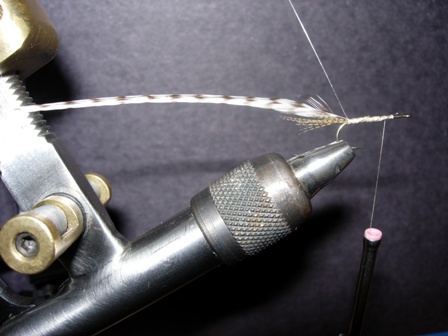
4b.
Avoid
tying down any of the wound
hackle. Once the feather is
secured, you can pull the post
and hackle rearward out of the
way for the time being.
|
 |
|
|
|
|
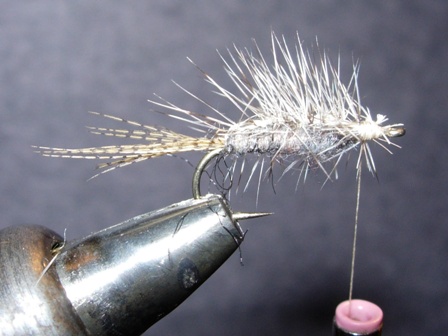
5.
Dub a sparse abdomen over the
rear 2/3 of the shank, and then dub a
fuller
thorax,
leaving room behind the eye for the
final steps. |
 |
|
|
|
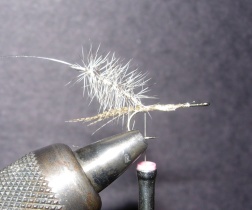
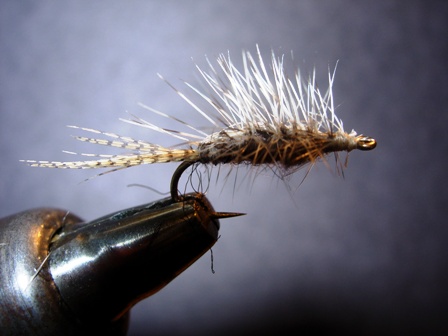
6a. Grab
the tip of the tippet material
with your hackle pliers and pull
the entire post forward over the
top of the abdomen and thorax,
keeping the post directly on top
of the body. At a point about
one eye-width behind the eye,
take 3 turns of thread over the
post to secure it in position.
Using your hackle pliers, pull
the post tight to take any slack
out of it and then tie it down
securely.
|
 |
|
|
|
|
6b. Carefully
trim the excess post and hackle and form
a nice small head. Apply a
drop
of superglue to the head and the spot
where the post was tied down.
Whip
finish. |
 |
|
|
|
|
Tying Tips
1.
Gallows tools are
inexpensive and are made to fit
the post on most vises. They are
quite handy when it comes to
making any type of posted wing.
2.
Keeping the completed fly
in the vise, turn it over and
clip off any stray hackle that
protrudes below the shank. This
fly pattern, like any post-style
fly, is designed to float in the
surface film.
Go crank some of these bugs, go
fish them, and…
|
|
|
|
|
 |
|