|
|
 |
||||||||||||||||
Materials
|
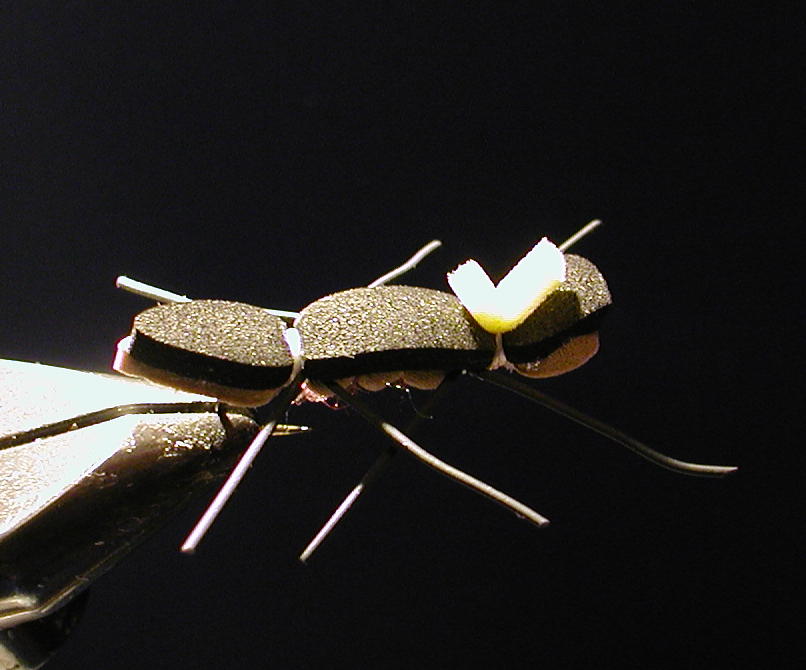
chernobyl ant
This fly looks like an ill-conceived, jumbled mess tied and glued
onto a hook. What self-respecting trout would take the monster?
Well…for one thing, my friend, past GBF president (and now Montana
resident) Marie Stull won the famous Jackson Hole one-fly contest
with it. Many guides tie this huge meal on clients’ leaders before
the drift boat is put n. Its origin is attributed variously to
Emmet Heath, a legendary Green River guide, and to Allan Woolley.
But it has undergone so many permutations that it has become one of
those generic patterns that is tied according to the particular
angler’s personal preferences. For example, changing the foam colors
and using knotted pheasant tail fibers for legs, together with a
deer hair wing, will turn the ant into a hopper. This fly has earned
a place in Dave Hughes’ "searching patterns" fly box. In Dave’s
words: "It is likely that whatever you tie, based on the Chernobyl
theme, it would take fish. It’s a shame, but that is trout fishing.
The goal of the game is to catch trout, and this fly does it." (See
Flyfishing & Tying Journal, Winter 2003 edition, page 41.
Amen—enough said.
|
||||||||||||||||
|
|
|||||||||||||||||
|
Instructions
Cut a section of tan foam into a strip around 1/4" in width, and 1 1/4" in length (proper dimensions for a #6 or 8 hook); this will be used to form the belly. At the same time, cut a strip of black foam to the same dimensions. Round one end of the foam strips, making sure that they are exactly even. [Note: foam cutters shaped for the Chernobyl Ant are available from River Road Creations at: "riverroadcreations.com"] Apply a coat of Flexament to the hook shank Take both sections of foam, even them up, and with the tan at the bottom, place them on top of the hook, with the round end to the rear, sticking out past the bend around 1/4". To avoid cutting the foam, make the first wrap fairly firm, while holding the foam tightly on top of the hook. Make each successive wrap tighter. Seven or eight wraps should be sufficient. It will still try to move around the hook, but the Flexament will eventually hold it and we will use Superglue when the fly is done. Pull back the black foam and take several wraps around the tan foam at the tie-in point. If you decide to form an underbody, wrap the thread forward to the front of the thread base, add dubbing (color of choice) to the thread, and dub backward to the point where the foam was tied in. If you are using a hackle underbody, wrap it backward in the same manner. Rotate the vise (or turn the fly over) and tie in two pieces of rubber leg material with "X" wraps. Now take 2 wraps between the sections so that they end up in an X shape. There are other ways to do this; I will demonstrate them at the monthly meeting. With the hook in the original position, wrap around the belly foam, keeping it on top of the hook. The wraps should be made in 1/8" increments, so that you achieve a segmented appearance. Stop at a point about 1/4" behind the hook eye. Turn the fly over again and, using the same procedures as in step 7, tie in the front legs. Return the hook to the upright position. Form one more segment with the tan foam; after doing this, you should still have about 1/8" of room Bring the black foam over the top and pull it forward so that the front end is matched with the front of the tan foam. Tie the black foam down at the point where you formed the last segment of the tan foam. Cut a tiny 1/8" wide, 1/4" long section of the indicator foam, and tie it in on top of the black foam at the Bring the thread under the front "tabs" of the foam, wrap a nice Grab the superglue and a bodkin. Place a tiny drop of glue on the tip of the bodkin and smear it on between the black and tan foam tabs at the head of the fly. Hold them together for a few seconds, taking care not to get glue on your fingers. It takes only a tiny amount of glue, and if done right it holds almost instantly. Use the same procedure to glue the rear tabs together. Turn the fly over and place a drop of glue on the head wraps, and the two points where the foam was cinched down. Take a deep breath. Fish this high-floating bomb in pockets and riffles. If you are drifting, toss it against the bank and tease it out in short strips, or under overhanging brush—and hang on. You can also suspend a nymph or midge from the bend of the ant. That is a very effective tactic, especially at the beginning of a hatch. See ya on the creek!!!
|
|||||||||||||||||

Copyright 1998 by Granite Bay Flycasters unless otherwise noted.